This is a HOW TO "article" I wanted to share on what I did to customise Woocommerce to display additional useful event / ticket information on the shop page under each event when using The Events Calendar and Event Tickets Plus plugins. I thought some people may find it useful.
Before I start:
Got all that? Okay then, let's begin.
I have The Events Calendar (Free) and Event Tickets Plus (Paid), and use Woocommerce (Free) as the e-commerce platform. All work well together and do pretty much all I need on sites that manage and sell tickets for events.
However, one of the things I really wanted was better, fuller information on the ticket products when they’re listed on Woocommerce shop pages.
One option was to add to / update the relevant post types (across both Woocommerce and Events), or create custom fields in both. But that would mean having to remember to manually update those fields if things changed for an event. Also, the data was already there in one form or another, and I didn't want to have duplicated information.
Knowing the data was already there somewhere, I thought it couldn't be that hard getting the data I wanted displayed where I wanted it. I didn't find much on any of the plugins' forums / knowledgebases specifically dealing with this so I thought I'd have a go and then share what I did, as I'm sure I'm not the only one who wants to do something like this.
The default product display in Woocommerce (whether it's tickets, T-shirts or kettles) is a grid of products showing a product image (if there is one), the title of the Product, maybe a short description, the product's price, and a button or link allowing you buy it or add it to the shopping cart.
Now, that's all well and good. But I wanted to show more information under the product image than that. Plus, I wanted the button under each ticket product to say "Event Details", and for it to take the customer to the detailed event page.
This is mainly because, for me, the main details are in the single event page, plus that’s where I have the “add tickets” and quantity selector bar. In other words, adding a ticket to the cart from the list makes no real sense. If you’re happy with the default button's text and behaviour then just ignore the section at the end dealing with that.
So, what did I want to be displayed under the product's image, apart from just the event title and price? Well, I thought it really needed to show the event's date and start time, a summary of the venue information, and ticket availability. Re the latter, I don't mean how many tickets are available. I personally don't like to show that. What I do mean is displaying one of four coloured status messages indicating purchase-ability (is that a word?).
The picture below illustrates the result using mock events showing all those possible stock information values in use.
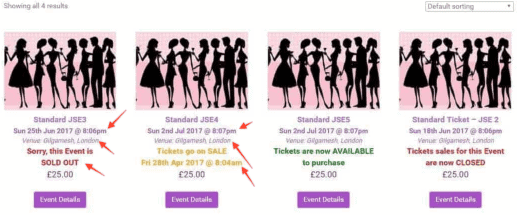
Of course, those are my choices. You can use the methods described here to display any existing meta data values, e.g. the number of tickets sold / remaining etc.
The purpose of this section is to explain how I figured out what was there and where to find it. Ultimately my research identified what and where the right data could be found, so that I could build a function for extracting it automatically (using a Woocommerce hook).
The reason for illustrating that process here is so that if you want different things displayed you can use this to help you find what you need. And armed with that you can easily modify the function to use the specific data you want to see. That said, you can skip straight to the function below if you just want to implement it as I have set it up.
Before we get to the nitty gritty, know that all Woocommerce ticket products (created from Event Tickets Plus) and all Events (created from The Event Calendar) are stored as posts.
Once you have figured out what you want to show, probably the hardest bit is determining what and where that data is held. Essentially, it will be in one or both of two places. Either within Event and/or Woocommerce product post metadata.
Data is stored as key/value pairs – this just means that there is a key (basically a label) that has a value associated with it. For example, there is a Woocommerce meta key called _price and the value stored with it (in this case) is a number representing the product price, e.g. 25.
To get to this data you need to examine the WordPress database itself. I started with the Woocommerce metadata. You can skip to the sample output below to save a little time but bear in mind that future updates to Woocommerce and/or Event Tickets Plus and/or The Event Calendar may add/remove/modify keys listed.
So, to do this yourself you can use whatever tool you’re comfortable with for that but I used PHPMyAdmin (the following assumes you know how to use a tool like PHPMyAdmin to view database tables / run queries etc - if not, skip ahead to the sample output).
If you view the database, you'll see many tables listed. The one we're interested in is has a name of xxxxx_postmeta (where xxxxx will be whatever prefix was generated when WordPress was originally installed). If you view that table you will see all the post metadata for the whole site. We really want to see what meta keys exist for tickets (we’ll look at Events metadata further down).
To do that we need to run a simple query specifically against a ticket post. So first we'll need to get the post ID of a ticket (any will do). To do that, from the WordPress Dashboard, under Woocommerce, click on Products. All the products will be listed on the right. Click on Edit on any that is a ticket. The post ID is in the URL in the browser address bar, for example:
.../wp-admin/post.php?post=315&action=edit
Entering the simple query below will list all the meta keys for that ticket (post ID of 315 in this case). Replace the two "xxxx"s with your own database prefix, and "PPP" with the post ID you found.
SELECT `meta_key` , `meta_value`
FROM `xxxx_postmeta`
WHERE `post_id` = PPP
ORDER BY `xxxx_postmeta`.`meta_key` ASCCode language: SQL (Structured Query Language) (sql)
For me, using a post ID of 315 yielded the following:
| meta_key | meta_value |
| _backorders | no |
| _crosssell_ids | a:0:{} |
| _downloadable | no |
| _edit_last | 2 |
| _edit_lock | 1490437846:2 |
| _featured | no |
| _global_stock_cap | 0 |
| _global_stock_mode | own |
| _height | |
| _length | |
| _manage_stock | yes |
| _price | 25 |
| _product_attributes | a:0:{} |
| _product_image_gallery | |
| _product_version | 2.6.14 |
| _purchase_note | 0 |
| _regular_price | 25 |
| _sale_price | |
| _sale_price_dates_from | |
| _sale_price_dates_to | |
| _sku | JSE5 |
| _sold_individually | |
| _stock | 20 |
| _stock_status | instock |
| _tax_class | |
| _tax_status | taxable |
| _thumbnail_id | 58 |
| _ticket_end_date | 15/08/2017 17:00:00 |
| _ticket_purchase_limit | 0 |
| _ticket_start_date | 08/02/2017 08:00:00 |
| _tribe_tickets_meta_enabled | 0 |
| _tribe_wooticket_for_event | 313 |
| _upsell_ids | a:0:{} |
| _virtual | yes |
| _visibility | visible |
| _wc_average_rating | 0 |
| _wc_rating_count | a:0:{} |
| _weight | |
| _width | |
| _total_sales | 0 |
These are all the meta keys and their associated values for that specific ticket - the majority are Woocommerce meta keys, the others are custom fields added by Event Tickets Plus. For the purposes of what I wanted I needed these:
The first two are the dates between when this ticket is available for purchase. Note, one or both can be empty. When you set up the ticket with Event Tickets Plus you have an option of adding either of these dates. If the start date is left blank it is treated as available "now". If the end date is left blank it is treated as the date and time the event itself ends (we will cater for that later on in the function).
The _stock_status key indicates whether the ticket is in or stock or not.
Those are the optional ones I needed for this exercise, but if you wanted to display tickets remaining, for example, you can see in the sample output you can use the _stock key.
Regardless of what data keys you choose to go with, you will always need the _tribe_wooticket_for_event key because we also need the Event post metadata associated with that ticket too (the function below needs to pull data from the ticket post as well as its corresponding Event post). I used a similar approach as above to get the Event metadata (see below). Note, there is a knowledge base article here that lists all the event post metadata keys. It includes PRO fields too, so bear that in mind if you don't have Events Calendar PRO (the fields I'm using didn’t require PRO).
So, using the process from before, here's how to get the Event meta data yourself...
View the database and find the xxxxx_postmeta file (if you're not already in there from earlier). This time we want to see what meta keys exist for Events.
So this time we'll need to get the post ID of an Event (any one will do). To do that, from the WordPress Dashboard, click Events. All the events will be listed on the right. Click on Edit on any one. The post ID is in the URL in the browser address bar, for example:
.../wp-admin/post.php?post=313&action=edit
Run exactly the same query as before, but change the post ID to be what you just found. This is what I got, using 313:
| meta_key | meta_value |
| _edit_last | 2 |
| _edit_lock | 1490453623:2 |
| _EventCost | 25 |
| _EventDuration | 0 |
| _EventEndDate | 02/07/2017 20:00:00 |
| _EventEndDateUTC | 02/07/2017 19:00:00 |
| _EventOrigin | events-calendar |
| _EventOrigin | events-calendar |
| _EventOrigin | events-calendar |
| _EventOrigin | events-calendar |
| _EventShowMap | 1 |
| _EventShowMapLink | 1 |
| _EventStartDate | 02/07/2017 20:00:00 |
| _EventStartDateUTC | 02/07/2017 19:00:00 |
| _EventTimezone | Europe/London |
| _EventTimezoneAbbr | BST |
| _EventURL | |
| _EventVenueID | 190 |
| _thumbnail_id | 58 |
| _transient_timeout_tribe_attendees | 1490200300 |
| _transient_tribe_attendees | a:0:{} |
| _tribe_deleted_attendees_count | 4 |
| _tribe_hide_attendees_ list | 1 |
| _tribe_modified_fields | a:13:{s:15:"_EventStar tDate";d:1490293076;s:13: "_E... |
| _tribe_post_root | JSE2- |
| _tribe_progressive_ticket_current_number | 5 |
| _tribe_ticket_global_stock_level | 148 |
| _tribe_ticket_header | 58 |
| _tribe_ticket_use_global_stock | |
| _wp_old_slug | jse-1 |
| _wp_old_slug | jse-4 |
These are all the meta keys and their associated values for that Event. For the purposes of what I wanted I'll need:
The first is the date and time of the event will take place. The second is the post ID of a post that contains venue information. I need this because I want some venue information displayed too. In this example, the post ID for the relevant venue is "190"). So, as you may have gathered, Venues are stored under their own posts. To get those keys we run the same query yet again but this time with the venue’s post ID. In my case I used “190”, which yielded:
| meta_key | meta_value |
| _edit_last | 2 |
| _edit_lock | 1489854105:2 |
| _EventShowMap | |
| _EventShowMapLink | |
| _VenueAddress | The Stables Market, Chalk Farm Road |
| _VenueCity | Camden |
| _VenueCountry | United Kingdom |
| _VenueOrigin | events-calendar |
| _VenuePhone | 0207 428 4922 |
| _VenueProvince | London |
| _VenueShowMap | TRUE |
| _VenueShowMapLink | TRUE |
| _VenueState | |
| _VenueStateProvince | London |
| _VenueURL | www.gilgameshbar.com |
| _VenueZip | NW1 8AH |
From these I need:
But I also want the Venue name which isn't in that bunch of keys! Hmmm. After a bit of rooting about, I discovered that the folks at Modern Tribe have a function reference (found here) that list all the functions available for us to use (if we wish).
One is tribe_get_venue which returns the Venue name using that post ID - we'll use that later in the function below.
We now know all the keys for the various bits and pieces we want to display. So armed with that, how do we display it? Well, we use the Woocommerce hook woocommerce_after_shop_loop_item_title. That's the entry point that allows us to create our own function to automatically interrogate these keys and display them on each Woocommerce ticket product on the shop page.
Below, then, is the function I wrote to process all those keys we discovered and display them. Comments are at the main sections explaining what's going on. Add the code snippet into your theme's functions.php file (preferably, for safety, your CHILD theme's functions.php).
NOTE 1: I had said earlier that if a date hasn’t been supplied (is blank) for when ticket sales should end, then the event plugin defaults the "end of sales date" to be the date and time the event itself is due to finish. In my case I want the default to be 24 hours before that. So I added a line to kind of do that. In reality, this will ONLY affect the message we’re adding under the product. If a customer goes to the single event page in that final 24 hours they could still purchase a ticket. So, if you really want ticket sales to stop at a particular
At some point, I may make it so that the calculation will then optionally update the actual meta key with the new calculated date/time. That is a little drastic and may not be what you want as it means any event, as soon as it is displayed on the shop page, will then get its ticket end of sales date updated from blank to 24 hours earlier! Hence me not taking it that far. If there seems to be a lot of demand then I will consider it (time permitting). Although it would be better if Modern Tribe could maybe add a Global setting that you could set for that.
Likewise, at some point, I may update/add a function that removes/disables the “Event Details” button (see the bottom section) once that time has passed.
However, on both fronts, I make no promises (it all comes down to need and time!). If I do though, I will post an update here.
However, if you’re happy with those shortcomings, but you want the end sale date to be a different time period, or to be the actual plugin default when blank, then you have 2 choices (respectively):
The line in question is the one with this comment at its end (highlighted below in the main code):
// Subtract 24 hoursCode language: PHP (php)To reiterate, this is only potentially an issue if you have not set the end of sales date/time for event tickets and left it blank.
NOTE 2: In the code, I've manually coloured the stock status messages using an inline style. Other than that, all the elements’ output provide their own CSS class so you can customise them through CSS further if you wish.
/*
 * Adds some post fields from a ticket's post meta data and corresponding Event's meta data so
 * they appear below Event titles in the Woo shop page.
 */
add_action( 'woocommerce_after_shop_loop_item_title', 'add_shop_event_details', 9 );
function add_shop_event_details() {
    // 1. Get the current Ticket post ID
    $ticket_post_id = get_the_id();

    // 2. Get correlating Event ID for this ticket product
    $evt_id = get_post_meta( $ticket_post_id , "_tribe_wooticket_for_event", true );

    // 3. Pull event time info
    $evt_datetime = get_post_meta( $evt_id, "_EventStartDate", true );
    $evt_datetime = date("D jS M Y @ g:ia",strtotime($evt_datetime));
    echo '<div class="product-meta-time" style="color: grey;">' . $evt_datetime . '</div>';

    // 4.Pull out some Venue info
    $venue_id = get_post_meta( $evt_id, "_EventVenueID", true );
    $venue_name = tribe_get_venue($venue_id);
    $venue_city = get_post_meta( $venue_id, "_VenueCity", true );
    $venue_prov = get_post_meta( $venue_id, "_VenueProvince", true );

    if ( trim($venue_city) != '' ) { $venue_prov = ', ' . $venue_prov; }

    echo '<div class="product-meta-venue" style="color: grey;">At ' . $venue_name . ' (' .
        $venue_city . $venue_prov . ')</div>';

    // 5.Pull stock status and ticket sale start / end date
    $today        = strtotime( date('Y-m-d H:i:s') );    // The date and time now.
    $stock_status    = get_post_meta( $ticket_post_id , "_stock_status", true );

    // 6. Determine when ticket sales can start
    $ticket_start_sale_date = get_post_meta( $ticket_post_id , "_ticket_start_date", true );
    $ticket_start_sale_date = trim( strtotime($ticket_start_sale_date) );

    // 7. If no sale start date supplied in the ticket, make sure the start date will be just
    //    before "now".
    if ($ticket_start_sale_date == '') {
        $ticket_start_sale_date = $today - 1;
    }

    // 8. Determine when ticket sales stop
    $ticket_end_sale_date   = get_post_meta( $ticket_post_id , "_ticket_end_date", true );
    $ticket_end_sale_date   = trim( strtotime($ticket_end_sale_date) );

    // 9. If no sale end date supplied in the ticket, default the close of sales 24 hours before
    //    Event finishing time
    if ($ticket_end_sale_date == '') {
        $ticket_end_sale_date = get_post_meta( $evt_id , "_EventEndDate", true );
        $ticket_end_sale_date = strtotime($ticket_end_sale_date);
        $ticket_end_sale_date = $ticket_end_sale_date - (24*60*60);    // Subtract 24 hours
    }

    // 10. Build the stock status message, depending on its availability...
    if ( $stock_status == "outofstock" ) {
        $stock_msg = '<div class="product-meta-stock" style="color: red;"><b>' .
            'Sorry, these tickets are<br />SOLD OUT</b></div>';

    } else if ( ( $ticket_start_sale_date <= $today ) && ( $today <= $ticket_end_sale_date ) ) {
        $stock_msg = '<div class="product-meta-stock" style="color: green;"><b>' .
            'Tickets AVAILABLE<br />to purchase</b></div>';
    } else if ( $ticket_end_sale_date <= $today ) {
        $stock_msg = '<div class="product-meta-stock" style="color: red;"><b>' .
            'Ticket sales for this Event<br />are now CLOSED</b></div>';
    } else {
        $stock_msg = '<div class="product-meta-stock" style="color: orange;"><b>' .
            'Tickets go ON SALE<br />' . date( "D jS M Y @ g:ia", $ticket_start_sale_date ) .
            '</b></div>';
    }
    echo $stock_msg;
}
Code language: PHP (php)Below is the other snippet you can optionally add (made up of two small functions). This changes the text on the button under an Event on the shop page from "Add to Cart" to "Event Details", and also changes the button's link to point to the appropriate Single Event page.
/*
 * Replace Add to Cart button with a button that goes to the product details
 *
 * First, remove default add to cart button on shop page
 */
add_action('init','remove_loop_button');
function remove_loop_button(){
    remove_action( 'woocommerce_after_shop_loop_item', 'woocommerce_template_loop_add_to_cart', 10 );
}
/*
 * Now add new button that links to appropriate single event page
 */
add_action('woocommerce_after_shop_loop_item','replace_add_to_cart');
function replace_add_to_cart() {
    global $product;
    $link = $product->get_permalink();
    echo do_shortcode('Event Details');
}Code language: PHP (php)
And that's pretty much it.
If this is useful to you, please feel free to use it. I would also love to hear your comments/suggestions.
Many thanks for this great tutorial. I am writing a plugin to provide a summary view in admin of all ticket sales against available tickets for each event. This gave me a great start to achieve that.
Thanks John, glad it helped.